Automate Android Apps With UI Automator
Yogendra Porwal
Posted On: July 4, 2025
![]() 222954 Views
222954 Views
![]() 10 Min Read
10 Min Read
UI Automator is an Android testing framework that allows you to automate UI testing of Android apps. It enables interaction with UI elements, sending input events, and verifying mobile app behaviors on emulators or real devices.
Overview
UI Automator is a framework to automate UI testing of Android apps. With UI Automator, you can perform interactions with UI elements and test app behaviors on emulators or real devices.
How to Run UI Automator Test
Here are the high-level steps to run Android UI Automator tests:
- Install Android Studio and JDK 8 or above, then set up ADB along with an emulator or a real Android device running API level 18 or higher.
- Add UI dependencies in the build.gradle file.
- Write a test:
- Use the UiDevice API to launch the app via ADB.
- Find web elements using the By.res() method.
- Interact (e.g., click the button) and assert test results.
- Use Android Studio’s test runner to execute tests.
TABLE OF CONTENTS
What Is UI Automator?
UI Automator is a framework for automating user interactions on mobile apps and system UI components on Android devices, such as launching the settings menu or interacting with the app launcher.
You can also locate UI components using intuitive attributes like visible text or content descriptions, without relying on internal implementation details of the mobile app.
UI Automator is based on instrumentation APIs and works with the AndroidJUnitRunner test runner. So, it is suitable for black-box testing scenarios where tests simulate user behavior without accessing the app’s codebase.
Prerequisites
Before writing your first Android UI Automator test for Android app testing, ensure you meet the following prerequisites:
- Install Android Studio and make sure the Android SDK tools are downloaded during setup.
- Install Java Development Kit (JDK) v8 or above.
- Set up an emulator (or real device) running Android 4.3 (API level 18) or above for testing.
- Add Android Debug Bridge (ADB) to your system path so you can run ADB commands from the terminal.
- Enable and use Layout Inspector in Android Studio to inspect UI elements and identify reliable selectors.
 Note
NoteTest your mobile apps on real Android devices. Try LambdaTest Today!
Add UI Automator Dependencies
Here we’ll use an Android emulator to execute tests. Once you have set up the Android emulator, let’s add the UI Automator dependencies:
- Create an Android testing project.
- To use UI Automator, add dependencies for uiautomator and junit in the app/build.gradle file.
- After adding these dependencies, sync the Gradle project.
|
1 2 3 4 5 6 |
dependencies { ... androidTestImplementation ‘androidx.test.ext:junit:1.2.1’ androidTestImplementation ‘androidx.test:runner:1.2.0’ androidTestImplementation ‘androidx.test.uiautomator:uiautomator:2.3.0’ } |
Write Tests With UI Automator
Let’s write a test to open the proverbial app and verify the button functionality.
Test Scenario:
|
Once your Android emulator is up, run the adb install <path-to-LambdaTest-proverbial-apk-file> command to install the LambdaTest proverbial app.
Implementation:
- Create a setup method with the @Before annotation.
- Use Layout Inspector to inspect and identify selectors/locators. Then, use the resource ID to uniquely identify the welcome message on the home page of the mobile app.
- Locate the text label element and verify its initial content.
- Simulate a user clicking the button that updates the text.
- Check if the text element updates as expected.
For this use case, we will initialize the UiDevice instance and press the Home button to ensure the test starts from the home screen.
|
1 2 3 4 5 |
@Before public void setup() { device = UiDevice.getInstance(InstrumentationRegistry.getInstrumentation()); device.pressHome(); } |
This setup will also include the launch of the proverbial app with the ADB command.
|
1 2 3 4 |
//start Proverbial app with adb command device.executeShellCommand("am start -n com.lambdatest.proverbial/.MainActivity”); // Validate that activity has been opened. Assert.assertTrue(device.hasObject(By.pkg(“com.lambdatest.proverbial”))); |
|
1 2 3 4 |
// initialize the text label element UiObject2 textElement = device.findObject(By.res(“<replace_with_package_name_of_app>”, "Textbox")); // Assert the initial text Assert.assertEquals("Hello! Welcome to lambdatest Sample App called Proverbial", textElement.getText()); |
|
1 2 3 |
UiObject2 textButton = device.findObject(By.res(PACKAGE_NAME, "Text")); //Click on Text button to update the element textButton.click(); |
|
1 2 |
//Assert that text has been updated. Assert.assertEquals("Proverbial", textElement.getText()); |
Run the Android UI Automator Tests
From the Android Studio, click Run ‘ProverbialTest’ to execute the tests:
You can notice that your test is executed and passed.

If you want to run Android automated tests at scale, you can leverage a cloud-based testing platform like LambdaTest. It is a GenAI-native test execution platform that offers a scalable real device cloud to run automated tests on real Android devices without the need for physical infrastructure.
With LambdaTest, you can test across a wide range of Android and iOS devices, covering multiple OS versions and device brands like iPhone, Samsung, Google Pixel, etc. It also supports automation using popular frameworks like Appium, Espresso, and XCUITest, enabling faster, more reliable mobile app testing at scale.
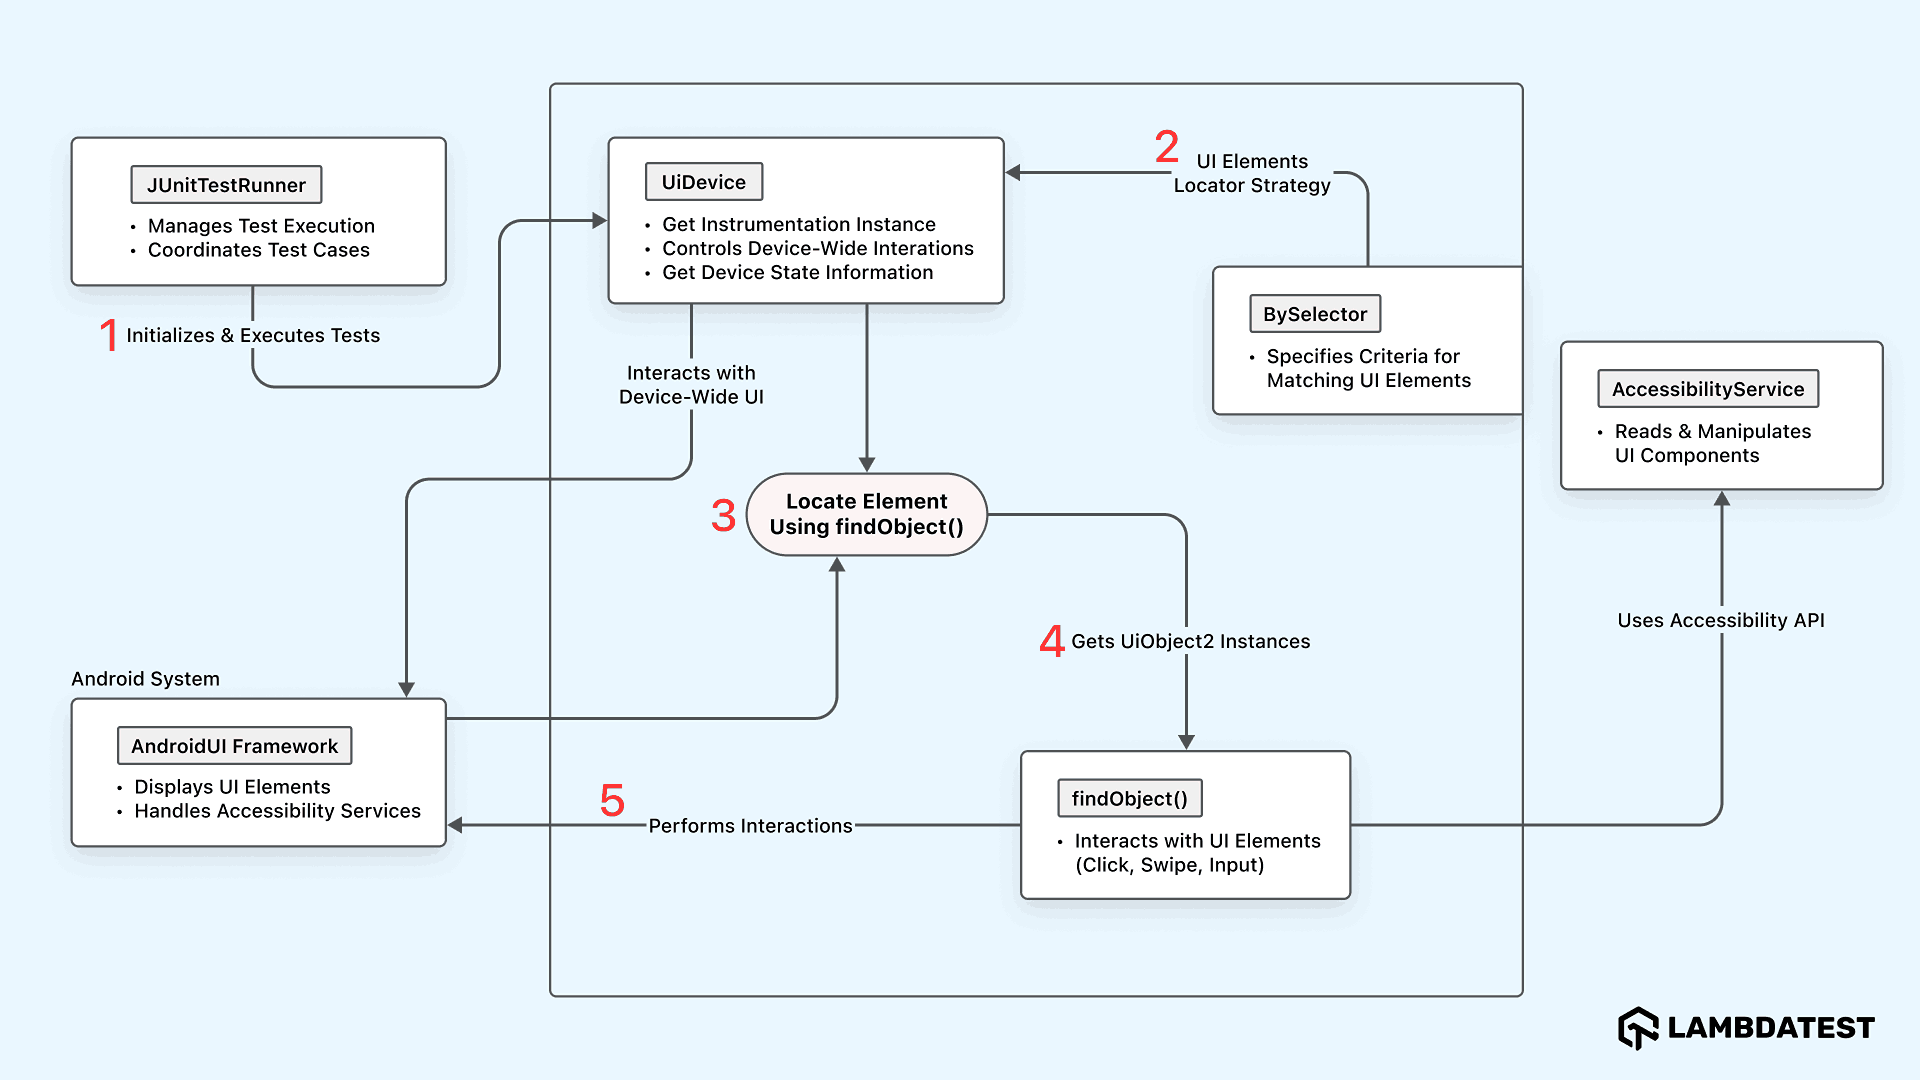
Key APIs of UI Automator
Let’s understand the key APIs of UI Automator that help interact with Android apps and their UI components, allowing automation of clicks, text input, scrolling, and more.

- JUnitTestRunner: Initializes and runs Android UI Automator tests, coordinating the execution flow of your test class.
- UiDevice: Represents the full Android device interface, allowing control over hardware buttons and system-level actions.
- BySelector: Defines criteria to locate UI elements using properties like text, class name, or resource ID.
- findObject(): Searches for a UI element in the device’s current UI hierarchy that matches the specified BySelector criteria.
- UiObject2: Represents a UI element and allows interactions like clicks, swipes, typing, and reading attributes.
- AccessibilityService: Reads and controls UI elements using the Android Accessibility API, often for enhanced automation or accessibility tools.
- AndroidUI Framework: Displays and manages the visible UI elements on the screen, bridging between the app’s layout and the system.
Best Practices for Writing Stable UI Automator Tests
To write Android UI Automator tests that are both stable and maintainable, you can consider the following best practices:
- Always Start From a Clean State: Before each test, reset your app or device to a known screen, like the home screen, using the device.pressHome() method.
- Use Reliable Selectors: When identifying UI elements, go for stable attributes like resource ID or content description using methods like By.res() or By.desc().
- Don’t Hard Code Waits: Avoid using the Thread.sleep() method. Instead, wait for elements or conditions dynamically using device.wait(Until.hasObject(…)). This makes your tests faster and more reliable across devices with different performance.
- Use Setup and Teardown Hooks: Structure your test classes with @Before to handle initial setup like launching the app or logging in, and @After to clean things up. This reduces repeated code and keeps tests consistent.
- Account for Device Differences: Android devices vary in screen sizes, OS versions, and themes, so your selectors should be flexible. Use methods like By.textStartsWith() or By.descContains() when the exact text isn’t ensured.
- Use Clear Names and Logs: Always use meaningful test method names like testLogin_showsErrorOnInvalidPassword() so others (or your future self) can quickly understand what the test does. Logging with the Log.d() method can also be really helpful when debugging issues, especially in CI pipelines.
- Reduce Randomness and External Dependencies: Network delays, real-time data, and third-party dependencies can cause flaky tests. Stub responses if you can, or use test environments. If unpredictability is unavoidable, add retry logic or longer timeouts to handle it.
If a test modifies settings or login state, make sure to clean that up afterward using @After methods. This keeps tests independent and repeatable.
Avoid relying on visible text, as it can change or get localized, making your tests flaky. If you’re building the app, add android:contentDescription to key elements to make them both testable and accessible.
Also, use @SdkSuppress to skip tests that aren’t applicable on certain Android versions.
Conclusion
If you’ve made it this far, you now have a solid foundation for using UI Automator to automate Android app testing, from setup and writing tests to understanding key APIs.
UI Automator is great for functional UI testing. However, running Android tests across many devices and OS versions can be complex and time-consuming. That’s where a platform like LambdaTest becomes helpful. It lets you instantly run automated tests on real Android devices in the cloud, no physical labs or maintenance needed.
Frequently Asked Questions (FAQs)
What is the use of UiAutomator2?
UiAutomator2 is a testing framework used for automating Android UI interactions on real devices and emulators. It’s commonly used to perform end-to-end testing of Android apps, especially when the test needs to interact with multiple Android apps or the system UI.
What is the difference between UI Automator and Espresso?
UI Automator can interact outside your mobile app, such as with the system UI or other mobile apps, making it suitable for broader, cross-app test scenarios. On the other hand, Espresso is used for testing within a single mobile app and offers fast, reliable UI tests for app components.
Is UI Automator suitable for game testing or complex gestures?
UI Automator supports basic gestures like swipe, drag, and pinch, but for high-performance apps like games, dedicated tools or instrumentation might be better.
What are the limitations of UI Automator?
It can’t access views within WebViews, doesn’t work well with custom rendering engines, and may struggle with dynamic content in some cases.
Can I use UI Automator with other frameworks like Appium?
Yes, Appium’s Android automation uses UiAutomator2 as its default engine, combining the flexibility of Appium with the native UI Automator APIs.
Citations
- Write automated tests with UI Automator: https://developer.android.com/training/testing/other-components/ui-automator
- AndroidJUnitRunner: https://developer.android.com/training/testing/instrumented-tests/androidx-test-libraries/runner
- Debug your layout with Layout Inspector: https://developer.android.com/studio/debug/layout-inspector
Got Questions? Drop them on LambdaTest Community. Visit now


